Using Python with Docker
Notes for running deep learning model with python inside Docker containers, and basic usage of Docker.
1. Running Python (Deep Learning) with Docker
A common headache in software projects is ensuring the correct versions of all dependencies are available on the current development system. Often you may be working on several distinct projects simultaneously each with its own potentially conflicting dependencies on external libraries. Additionally you may be working across multiple different machines (for example a personal laptop and University computers) with possibly different operating systems. Further, you may not have root-level access to a system you are working on and so not be able to install software at a system-wide level and system updates may cause library versions to be changed to incompatible versions.
One way of overcoming these issues is to use project-specific virtual environments. In this context a virtual environment or machine are isolated development environments where the external dependencies of a project can be installed and managed independent of the system-wide versions (and those of the environments of other projects).
Here, we introduce how to use Docker to create a virtual machine to run python 3.
Running Docker container
Note: Make sure the Docker has been installed on your personal PC or other devices. The installation instructions can be found on the official documentation, for Windows, Mac, Ubuntu.
Open a bash terminal.
We first need to pull the latest nvidia/cuda docker image from the remote repo:
1
docker pull nvidia/cuda
we can use command
docker search cudato search docker images.Using
docker imagesconfirms whether the image was successfully pulled:1
2
3
4
5
6$ docker images
REPOSITORY TAG IMAGE ID CREATED SIZE
ubuntu latest 549b9b86cb8d 3 weeks ago 64.2MB
nvidia/cuda latest 9e47e9dfcb9a 5 weeks ago 2.83GB
nginx latest 231d40e811cd 7 weeks ago 126MBNow, run the docker container with
docker run [OPTIONS] IMAGE[:TAG|@DIGEST] [COMMAND] [ARG...]:1
docker run -it -d --name VideoPose3D --runtime=nvidia --volume="$PWD:/app" nvidia/cuda:10.1-cudnn7-devel-ubuntu16.04
Here, the tag of the ‘nvidia/cuda’ image is 10.1-cudnn7-devel-ubuntu16.04 instead of latest.
List running containers:
1
2
3
4$ docker ps
CONTAINER ID IMAGE COMMAND CREATED STATUS PORTS NAMES
08f9ae536985 nvidia/cuda:10.1-cudnn7-devel-ubuntu16.04 "/bin/bash" 3 hours ago Up 3 hours VideoPose3DNext, execute an interactive bash shell on the container.
1
docker exec -it VideoPose3D bash
This will create a new Bash session in the container
VideoPose3D. If we did not assign a name to the container, we can exec the container withdocker exec -it containerID bash.
Now, we are done. We are already inside the Docker container. Then we install Miniconda.
Installing Miniconda
Because there is no necessary tools in the image, we need to install them first. Also, the image probably has no apt package cache, we need to run:
1
apt-get update
then, install
wgetcommand-line tool:1
apt-get install wget
Download the latest 64-bit Python 3 Miniconda install script:
1
wget https://repo.continuum.io/miniconda/Miniconda3-latest-Linux-x86_64.sh
Now run the install script:
1
bash Miniconda3-latest-Linux-x86_64.sh
You will first be asked to review the software license agreement. Assuming you choose to agree, you will then be asked to choose an install location for Miniconda. The default is to install in the root of your home directory
~/miniconda3or/root/miniconda3. We recommend going with this default unless you have a particular reason to do otherwise.Append the Miniconda binaries directory to
PATHin manually in~/.bash_envusing1
echo "export PATH=\""\$PATH":$HOME/miniconda3/bin\"" >> ~/.bash_env
For those who this appears a bit opaque to and want to know what is going on see here 1.
We now need to
sourcethe updated~/.bash_envso that the PATH variable in the current terminal session is updated:1
source ~/.bash_env
From the next time you log in all future terminal sessions should have the updated
PATHloaded by default.
Creating the Conda environment
You should now have a working Conda installation. If you run1
conda --help
Note: from a terminal you should see the Conda help page displayed. If you get a No command 'conda' found error you should check you have set up your PATH variable correctly (you can get a demonstrator to help you do this).
Assuming Conda is working, we will now create our Conda environment:
1 | conda create --name vp3d python=3 |
This bootstraps a new Conda environment named vp3d with a minimal Python 3 install. You will be presented with a ‘package plan’ listing the packages to be installed and asked whether to proceed: type y then enter.
We will now activate our created environment:
1 | source activate vp3d |
When a environment is activated its name will be prepended on to the prompt which should now look something like(vp3d) [machine-name]:~$ on terminal.
You need to run this source activate vp3d command every time you wish to activate the vp3d environment in a terminal. When the environment is activated, the environment will be searched first when running commands so that e.g. python will launch the Python interpreter installed locally in the vp3d environment rather than a system-wide version.
We can now install the dependencies for the specific project into the new environment, like:1
conda install numpy scipy matplotlib jupyter
Once the installation is finished, to recover some disk space we can clear the package tarballs Conda just downloaded:1
conda clean -t
These tarballs are usually cached to allow quicker installation into additional environments however we will only be using a single environment here so there is no need to keep them on disk.
[1] The echo command causes the following text to be streamed to an output (standard terminal output by default). Here we use the append redirection operator >> to redirect the echo output to a file ~/.bash_env, with it being appended to the end of the current file. The text actually added is export PATH="$PATH:[your-home-directory]/miniconda/bin" with the \" being used to escape the quote characters. The export command defines system-wide environment variables (more rigorously those inherited by child shells) with PATH being the environment variable defining where bash searches for executables as a colon-seperated list of directories. Here we add the Miniconda binary directory to the end of the current PATH definition. ↩
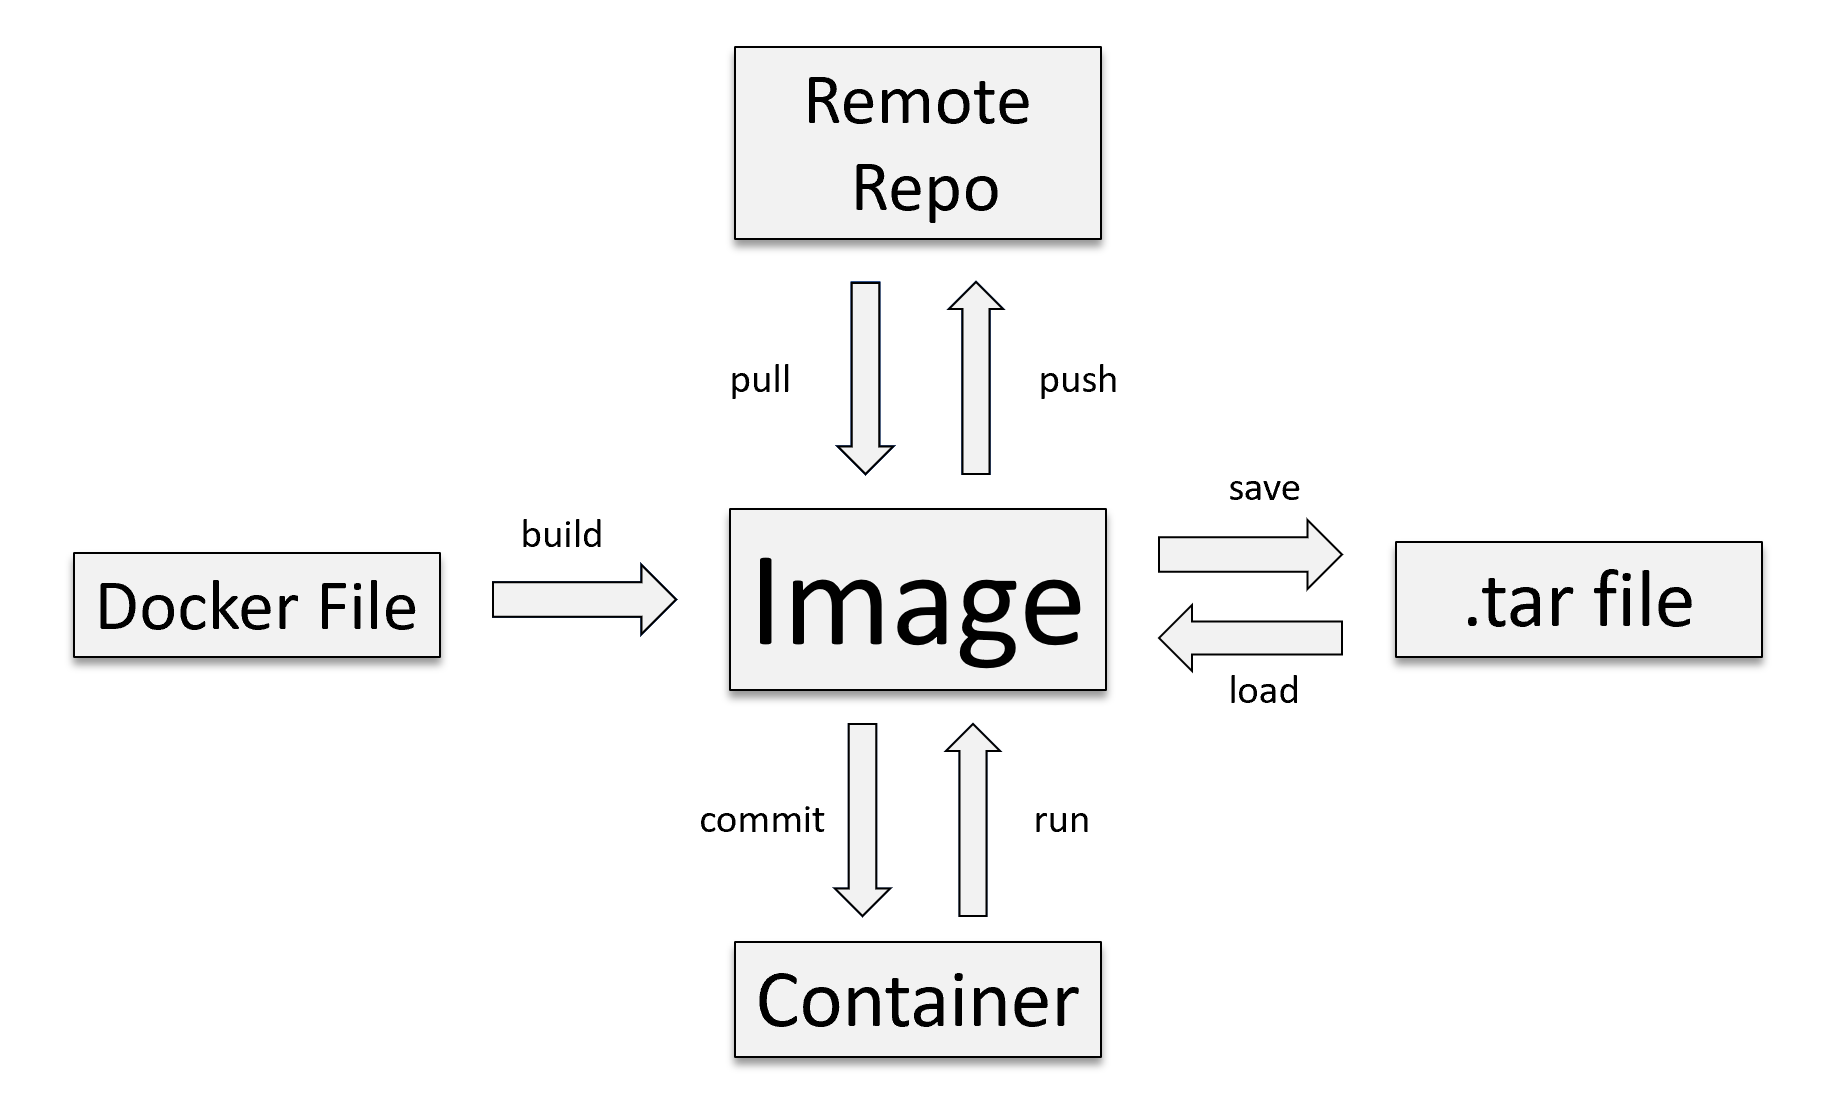
2. Docker Basic Logic Flow
3. Docker command
Check docker version
Usage:
docker versionExample:
1
2
3
4
5
6
7
8
9
10
11
12
13
14
15
16
17
18
19
20
21
22
23
24
25
26
27
28
29$ docker version
Client: Docker Engine - Community
Version: 19.03.5
API version: 1.40
Go version: go1.12.12
Git commit: 633a0ea
Built: Wed Nov 13 07:22:37 2019
OS/Arch: windows/amd64
Experimental: false
Server: Docker Engine - Community
Engine:
Version: 19.03.5
API version: 1.40 (minimum version 1.12)
Go version: go1.12.12
Git commit: 633a0ea
Built: Wed Nov 13 07:29:19 2019
OS/Arch: linux/amd64
Experimental: false
containerd:
Version: v1.2.10
GitCommit: b34a5c8af56e510852c35414db4c1f4fa6172339
runc:
Version: 1.0.0-rc8+dev
GitCommit: 3e425f80a8c931f88e6d94a8c831b9d5aa481657
docker-init:
Version: 0.18.0
GitCommit: fec3683
Search Images
Usage:
Search the Docker Hub for images, [more info]1
docker search [OPTIONS] TERM
Example:
1
docker search debian
Pull Images
Usage:
Pull an image or a repository from a registry, [more info]1
docker pull [OPTIONS] NAME[:TAG|@DIGEST]
Example:
1
docker pull debian
List Images
Usage:
1
docker images [OPTIONS] [REPOSITORY[:TAG]]
Example: running
docker images.1
2
3
4
5
6$ docker images
REPOSITORY TAG IMAGE ID CREATED SIZE
ubuntu latest 549b9b86cb8d 3 weeks ago 64.2MB
nvidia/cuda latest 9e47e9dfcb9a 5 weeks ago 2.83GB
nginx latest 231d40e811cd 7 weeks ago 126MB
List Containers
Usage:
1
docker ps [options]
Options:
| Name, shorthand | Default | Description |
|---|---|---|
| –all , -a | Show all containers (default shows just running) | |
| –last , -n | -1 | Show n last created containers (includes all states) |
| … | … |
- Example: running
docker ps1
2
3
4
5$ docker ps
CONTAINER ID IMAGE COMMAND CREATED STATUS PORTS NAMES
4c01db0b339c ubuntu:12.04 bash 17 seconds ago Up 16 seconds 3300-3310/tcp webapp
d7886598dbe2 crosbymichael/redis:latest /redis-server --dir 33 minutes ago Up 33 minutes 6379/tcp redis,webapp/db
Run Containers
Usage:
Run a command in a new container, [more info]1
docker run [OPTIONS] IMAGE[:TAG|@DIGEST] [COMMAND] [ARG...]
Options:
| Name, shorthand | Default | Description |
|---|---|---|
| –detach , -d | Run container in background and print container ID | |
| –publish , -p | Publish a container’s port(s) to the host | |
| –name | Assign a name to the container | |
| –volume , -v | Bind mount a volume | |
| –interactive , -i | Keep STDIN open even if not attached | |
| –tty , -t | Allocate a pseudo-TTY | |
| … | … |
- Example:
1
docker run -it -d --name VideoPose3D --runtime=nvidia --volume="$PWD:/app" nvidia/cuda:10.1-cudnn7-devel-ubuntu16.04
Run a command in a running container
Usage:
docker exec [OPTIONS] CONTAINER COMMAND [ARG…], [more info]1
docker exec [OPTIONS] CONTAINER COMMAND [ARG...]
Options:
| Name, shorthand | Default | Description |
|---|---|---|
| –detach , -d | Run container in background and print container ID | |
| –interactive , -i | Keep STDIN open even if not attached | |
| –tty , -t | Allocate a pseudo-TTY | |
| … | … |
- Example: This will create a new Bash session in the container
1
docker exec -it VideoPose3D bash
VideoPose3D. If we did not assign a name to the container, we can exec the container withdocker exec -it containerID bash.
- Title: Using Python with Docker
- Author: Zhanhang (Matthew) ZENG
- Link: https://zengzhanhang.com/2020/07/14/docker_usage_cheat_sheet/
- Released Date: 2020-07-14
- Last update: 2020-12-29
- Statement: All articles in this blog, unless otherwise stated, are based on the CC BY-NC-SA 4.0 license.